Wednesday, February 24, 2016

DIY Headband Stand

I have seen a few different kinds of headband stands and knew I wanted to make one for my girls to keep their headbands under control! I took a little bit of a different approach and wanted to share my tutorial with you:


Supplies:

Candle sticks
Round containers to cover
Burlap
Spray Adhesive
Glue Gun
Gem (optional)

I had these 2 metal, thick candle sticks that I bought years ago on clearance. They were a grayish color that wasn't my favorite, but I knew with a little spray paint, they would be perfect. I sprayed each candle stick with Rust-Oleum's Oil Rubbed Bronze.


While they were drying, I prepped my round containers. I bought oatmeal contains but they ended up too small for my candlesticks so I found something else in my pantry. My husband had Performance Drink Powder in the containers below. Luckily, they were almost empty so I took the labels off, put the labels on a large ziplock bag and dumped the rest of the powder in the ziplock bags!! I thought he might be a touch mad, but he didn't mind! Whew!! :)


Then I started wrapping each container with the burlap. I made sure to have a nice seam in the back and fold the ends under. I glued the seam down with hot glue. On the bottom, I put a line of hot glue around the entire bottom and glued the burlap around to the bottom. I cut off any extra to make it as flat as I could. Then the top...this was a little bit more tricky as I knew this side would be visible. I played around with it for a little to get my desired look. I just bunched the burlap together and then hot glued everywhere to keep it down. Here is a close up for the top:


After each container was wrapped in burlap, I hot glued it to the candlesticks. Here is a shot of the seam in the back:


The very last step was to glue a charm on the top to cover the burlap edge on the top. This gem was actually just found at Walmart awhile ago! 


Cute, right?! 


I love how they turned out. I love the difference in height the candlesticks give. And best of all, I was able to use things I had around my house!

Monday, February 22, 2016

Vinyl Star Wall In Playroom


Doesn't this just look dreamy? I purchased a set of vinyl stars off of Groupon a while back. It was a great deal and come with 120 star stickers. I could actually pick out the color of stars I wanted too. I knew I wanted gray and white with pops of red in my girl's playroom so I choose the silver stars. I was nervous about applying them to the wall. (that's why I've had them for so long and JUST now got to putting them up!) But it was super easy. I first had to figure out the spacing. I just measured my wall and guessed that I wanted about 9 inches in between each star. I divided my wall size by 9 and came up with my measurements. I ended up doing 9 rows and 12 columns with 9 inches in between each star. I used a tape measure and measured each star placement and added a small dot with a pencil. Then the fun part...adding the stickers to where I put those dots. It was fun and my girls loved helping! It was a super easy but a little time consuming to measure all the star placements. Overall, I would do it again to another room. I love the look it gives the playroom!

Source List:
Vinyl Stars - Decomodwalls.etsy.com through Groupon
Teepee - The Land of Nod
Pillows - Target
Rug - TJ Maxx
Desk - Vintage

Thursday, February 18, 2016

Fixer Upper Style Wall Decor


I LOVE Fixer Upper and everything Joanna Gains creates. But honestly, I think her store is a little pricey. Her cotton stems are $9 each, plus shipping! I just couldn't get myself to pay that. So when I heard Hobby Lobby started carrying them, I was beyond excited. I headed to my Hobby Lobby and luckily for me, they were 50% off too! They rang up $3 a stem! Score!! I bought this metal wall hanger at a yard sale for around $3 and I spray painted it with Rustoleum's Oil Rubbed Bronze. And then it sat in my office for the longest time until I figured out what flowers I wanted in it. I actually wanted to get the cotton stems for it, but again, I couldn't get myself to pay that price. So it sat and sat and sat until today! I love it and it gives my kitchen that perfect Joanna Gains touch!

Friday, September 25, 2015

DIY - Pottery Barn Inspired Mummy Pillow

 I saw this adorable mummy pillow in the latest Pottery Barn catalog and thought, I could make that! Although Pottery Barn does have much better photographers, my pillow above looks just like theirs below and didn't cost me the $32.50 that the Pottery Barn one would! And it's so easy to make too!
 I found some extra white cotton fabric I had laying around. After measuring, I decided to make it 14 inches square before sewing.
 I took my fabric and folded it in half and quickly pinned it so the fabric didn't move while I cut. I measured and marked my lines at the top and cut.
 Then I simply cut the fold to make 2 separate squares.
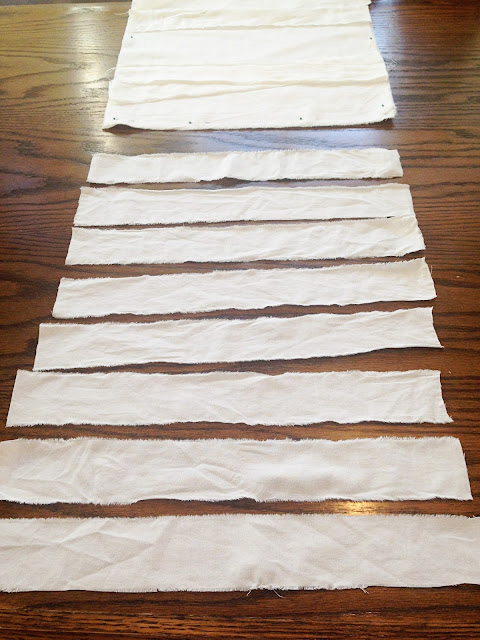
 Then I took my left over material and ripped 1.5 inch strips. To get the right look for the mummy, they need to be ripped. I used my first strip to measure the rest. I cut a small snip in the fabric and then ripped them apart. My girls actually loved helping me with this part!
 I had about 10 strips that I cut just a tad longer than my pillow squares. I also went through each strip and made sure they looked ratty. I pulled more strings off and really made the edges raw.
 After my strips were ready, I started laying them out on ONE of the white squares. Make sure you leave room for the eyes. 
 Then I pinned the second white square on top of the square with all the strips. And very carefully pinned the whole way around. I used a lot of pins so the strips wouldn't move around. *NOTE: your mummy design is in the inside. Once you turn it right side out, it will be correct!
 After everything is pinned, I sewed the whole way around the pillow leaving a 3 inch gap so I could turn it right side and stuff the pillow. I also left a 1/2 inch seam allowance to make sure all my strips were under my stitch and to make my pillow a nice 13 inch square pillow!
 After sewing, I cut the corners off each corner. This helps make the pillow corners nice and pointy. And then I also trimmed the extra fabric off the make it looked clean and so the pillow wasn't bunchy when I turned it.
 All cleaned up and ready to be turned right-side out!
 Next I used some black felt and more of my white fabric to cut out 3 circles. I then quickly hand sewed the small black circle to the other 2 circles and then sewed the group of circles to the pillow with a quick stitch around the black part of the eyes. 
 Then I stuffed him and hand sewed the hole on the bottom.
It was a super easy craft that my girls really enjoyed helping me with! And since I had all the materials on hand, my little mummy pillow was free which is awesome compared to the $32.50 price tag the Pottery Barn pillow has!!

Thursday, September 24, 2015

DIY - Getting Organized with Barn Wood!!

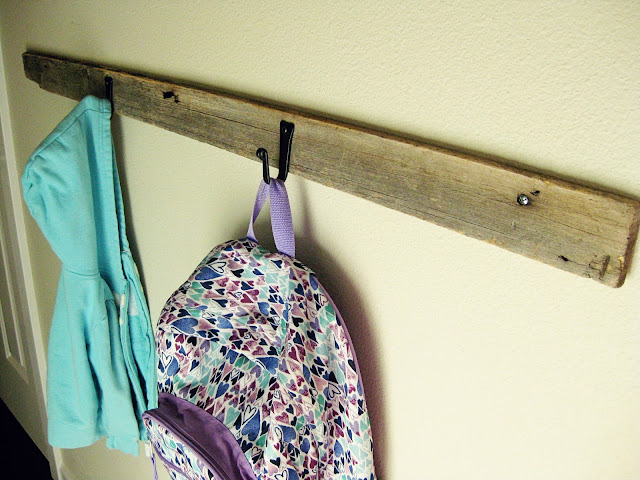
Our home has a long hallway to the garage and not any space for a normal mudroom. So I had to come up with something else for my girls to throw hang their backpacks and jackets. I was about to throw this long, narrow piece of barn wood away, because I couldn't think of anything to use it for. Then it hit me...this would be perfect if I just added some hooks!
 I had previously bought these cute little hooks in Lancaster, PA at an iron store. I had them for years and finally found the perfect spot for them. I simply attached the iron hooks using small screws and then using anchors and larger screws, I screwed the barn wood to the wall. That was it! I didn't sand it. I didn't stain it. I loved the natural look so I left it as it was. It was a super easy project that I LOVE. My girls now have a place to keep their backpacks and jackets, and they are no longer on the floor! The lesson learned from this is to never throw away thing away! Ha! 
Hopefully, this inspires you to use what you have or that random piece of wood in the garage for your next project! 
Related Posts Plugin for WordPress, Blogger...